Serving deep learning model using Apache Mxnet Model Server
Summary
In this post, i will summarize steps needed when using Mxnet Model Server (shorten as mms). If you want a working-example please see the followed example or use the source code is at mms_example
I still don’t know how to do the following tasks using mms only
- server monitoring : maybe a munin plugin is enough
- hot-restart : allow mms to re-load 1 model without restarting everything
- depploying on multiple nodes : maybe we need to put mms inside docker container and use kubernete to orchestrate
Detail
What is mms ?
From the mms home page
Model Server for Apache MXNet (MMS) is a flexible
and easy to use tool for serving deep learning models
 exported from MXNet or the Open Neural Network Exchange (ONNX).
In a short word, Mxnet Model Server (mms) is a tool to serve trained model.
Why mms is needed ?
After spending hours training deep learning network, we’ll have to serve the model. Sometimes is for illustrating the research result, sometimes is for using trained model on special service. As showed in the following graph
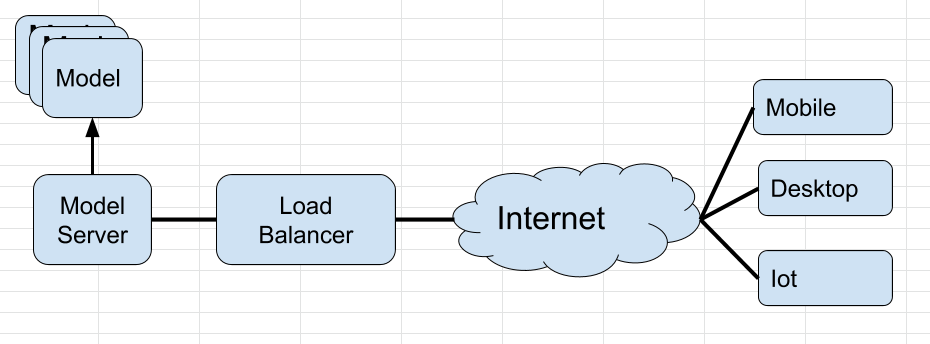
The Model server’s performance should be created and sastified following parameters. (source)
- High Performance (Optimization)
- High Availability (Self-recovery)
- Security Networking (SSL)
- Able to be Monitored
- Model Decoupling (isolated model from others)
- Cross Framework (Supprot multiple framework)
- Cross Platform (Support multiple server platform)
There’s several tutorials out there that told you how easy it is to write model server by hand such as medium. DON’T DO THAT, YOU’RE RE-INVETING THE WHEEL. And believe me, your lovely wheel is always worse than mms.
The lastest version of mms is v1.0.4 (6th of June 2019), so it should be considered stable enough for industrial level software.
Like other software developer, i created this model server by hand too, using Flask, Celery, RabbitMq, Redis. Still love my work, but Using mms in the first step could save me months of work.
How to use mms ?
The following steps is required to use mms
- Install mxnet model server
- Setup project
- Write your service file
- Create model-archieve
- Serve the model
I strucutre project structure in the following format.
mms_example
├── environment.yml         : python anaconda environment
├── imgs                    : images
├── logs                    : log files of mms
├── mms                     : source code for each model
│   ├── densenet-pytorch    : source code to serve densenet-pytorch
        ├──  densenet_service.py : densenet-pytorch service file
├── config.properties       : setting file of mms
├── model-archives          : model archieve file for mms
└── README.md               : this file
Note: a service file is a file to guide mms how to load and inference your model. A model-archive is mms’s special file type with extension in .mar. Inside this file is service file, model file, label file.
Install mxnet model server
Please see the mms home page or use the python anaconda environment file in example project.
Setup project
Download mms_example and create your project at the following location
mms_example
├── mms                     : source code for each model
│   ├── your-model          : source code to serve your-model
        your-model_service.py : your source file
Write your service file
A service file template is as followed
class YourClassifier():
    def __init__(self):

        ....

    def initialize(self, context):
        """
           Load the model and mapping file to perform infernece.
        """

        ....

    def preprocess(self, data):
        """
         Scales, crops, and normalizes a PIL image for a PyTorch model,
         returns an Numpy array
        """

    def inference(self, img, topk=5):
      ''' Predict the class (or classes) of an image using a trained deep learning model.
       '''
      ...

    def postprocess(self, inference_output):
      ...

_service = YourClassifier()

# see detail of context parameter at : https://github.com/awslabs/mxnet-model-server/blob/2d400f9c83638b794b6fa3de625712a0868baf59/mms/context.py
def handle(data, context):
    if not _service.initialized:
        _service.initialize(context)

    # uploaded data through POST
    if data is None:
        return None

    # The data will be process as follow
    data = _service.preprocess(data)
    data = _service.inference(data)
    data = _service.postprocess(data)

    return data
Create model archieve
cd mms/your-model
model-archiver --model-name your-model --model-path . --handler your-model_service:handle --export-path ../../model-archives
Serve the model
cd mms
mxnet-model-server --start
- Hint : We can edit how the model will be served by editing config.properties file. Personally, i used the following parameters.
# See https://github.com/awslabs/mxnet-model-server/blob/master/docker/advanced_settings.md

# location of mms .mar file
model_store=./model-archives
# Read all the .mar file
load_models=ALL
# You can set to your own model name
# load_model=your-model

# port
inference_address=http://0.0.0.0:8080
management_address=http://0.0.0.0:8081
- Test our model
curl -X POST http://127.0.0.1:8080/predictions/your-model -T image.jpg
Hints
- you can read detail of mms api using the following command
curl -X OPTIONS http://0.0.0.0:8080
- we can do benchmark of our webserver by using the following command. See mms docs
ab -k -l -n 10000 -c 10 -T "image/jpeg" -p kitten.jpg http://127.0.0.1:8080/predictions/mxnet_resnet50
- use the following code to read image from post into PIL Image
        image = data[0].get("data")
        if image is None:
            image = data[0].get("body")
        image = Image.open(io.BytesIO(image))
- we need to define how the data is process in the handle function.
def handle(data, context):
    if not _service.initialized:
        _service.initialize(context)

    # uploaded data through POST
    if data is None:
        return None

    # The data will be process as follow
    data = _service.preprocess(data)
    data = _service.inference(data)
    data = _service.postprocess(data)

    return data
End
Leave a comment