Learning ROS. Part 2
Writing Simple ROS program
In this post i’ll go through some basic command when using ROS. Later i’ll try to write simple publisher-subcriber node. And finally add some opencv function into each node to create a camera streaming application.
Create workspace
# Create workspace at: ROS-tutorial
mkdir -p ~/workspace/github/ROS-tutorial/
# Create src directory
# New package will be put under this directory
mkdir -p ~/workspace/github/ROS-tutorial/src
Import project into Eclipse
I use Eclipse to edit cpp source file. We can go to How to use IDEs for other IDE’s configuration.
cd ~/workspace/github/ROS-tutorial/
# Generate eclipse-project configuration file .project
catkin_make --force-cmake -G"Eclipse CDT4 - Unix Makefiles"
# Pass the current shell environment into the make process in Eclipse.
awk -f $(rospack find mk)/eclipse.awk build/.project > build/.project_with_env && mv build/.project_with_env build/.project
# Force Eclipse to use .bashrc environment
# Use Alacarte to edit the launch properties
bash -i -c ~/eclipse/eclipse
# Now start Eclipse, select File --> Import --> Existing projects into workspace, hit next, then browse for your package's directory (select root directory)
1st version: hello world
# move into src
cd ~/workspace/github/ROS-tutorial/src
# Create skeleton files
catkin_create_pkg tut1 std_msgs rospy roscpp
# Directory structure
ROS-tutorial/
└── src
    └── tut1
        ├── include
        │   └── tut1
        └── src
        ├── CMakeLists.txt
        ├── package.xml
# Create a hello.cpp
ROS-tutorial/
└── src
    └── tut1
        ├── include
        │   └── tut1
        └── src
            └── hello.cpp     <---  1. add file here
        ├── CMakeLists.txt    <---- 2. Edit make file
        ├── package.xml
hello.cpp contains
#include <ros/ros.h>

int main(int argc, char **argv) {
    // Init the ROS system
    ros::init(argc, argv, "hello_ros");

    // Establish this program as a ROS node
    ros::NodeHandle nh;

    // Send some output as a log message
    ROS_INFO_STREAM("Hello ROS!");
}
Add the abive CMakeLists.txt the following lines
add_executable(hello src/hello.cpp)
target_link_libraries(hello ${catkin_LIBRARIES})
Then build the package
cd ROS-tutorial/
catkin_make
Then execute the hello program
# In 1st terminal
roscore
# In 2nd terminal
# rosrun [package_name] [executable_name]
rosrun tut1 hello
# Sample output
# (base) gachiemchiep@Home:~/workspace/github/ROS-tutorial$ rosrun tut1 hello
# [ INFO] [1556961091.337440001]: Hello ROS!
2nd version
The rqt_graph of 2nd version is as follow :

Source code is available at: ROS_tutorial or github. The new 2 files publisher.cpp and subcriber.cpp is at following location
catkin_create_pkg tut2 std_msgs rospy roscpp
# See the ROS_tutorial link above for detail of 1, 2, 3
ROS-tutorial/
└── src
    └── tut2
        ├── include
        │   └── tut2
        └── src
            └── publisher.cpp     <---  1. add file here
            └── subcriber.cpp     <---  2. add file here
        ├── CMakeLists.txt        <---- 3. Edit make file
        ├── package.xml
Build the package
cd ROS-tutorial/
catkin_make
# Or click the build icon on eclipse IDE
Then execute Program
# In 1st terminal
roscore
# In 2nd terminal
# rosrun [package_name] [executable_name]
rosrun tut2 publisher
# [ INFO] [1557034017.547369173]: hello world 512
# In 3rd terminal
rosrun tut2 subcriber
3rd version
Now we’ve understand the basic of ROS, let’s try to make a harder program. The rqt_graph of 3rd version is as follow.
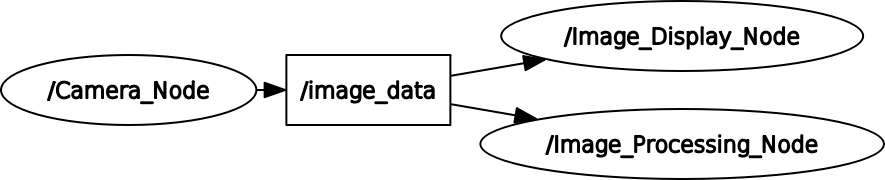
- Camera_Node read image from camera then publish image data to img_data topics
- Img_Display_Node subcribe to img_data topics , then when the queue is filled, read the image data and display it
- Img_Process_Node subcribe to img_data topics , then when the queue is filled, read the image data, change to grayscale and display it
We’ll use opencv to read image from camera. As we all know, opencv use the cv::Mat format to store matrix data. So to publish/subcribe to this format, we’ll use ros_cv_bridge and ros_image_transport package.
Source code is available at: github. The project’s structure is as follow:
# Create package
catkin_create_pkg tut3 std_msgs rospy roscpp cv_bridge image_transport
# See the github link above for detail of source code
# The naming of cpp files is silly here, so please ignore this
ROS-tutorial/
└── src
    └── tut3
        ├── include
        │   └── tut3
        └── src
            └── Camera_Node.cpp           <---  1. add file here
            └── Img_Display_Node.cpp      <---  2. add file here
            └── Img_Process_Node.cpp      <---  3. add file here
        ├── CMakeLists.txt                <---- 4. Edit make file
        ├── package.xml
Build the package
cd ROS-tutorial/
catkin_make
# Or click the build icon on eclipse IDE
Then execute Program
# In 1st terminal
roscore
# In 2nd terminal
# rosrun [package_name] [executable_name]
rosrun tut3 Camera_Node
# [ INFO] [1557039050.067208708]: Send 2672 th image
# In 3rd terminal
rosrun tut3 Img_Process_Node
# In 4th terminal
rosrun tut3 Img_Display_Node
Reference
以上
Leave a comment